Nach dem Wechsel zu Home Assistant als Smarthome-Lösung konnte ich mich austoben um mein Home weiter smart zu machen. Dabei habe ich auch ordentlich Zeit in die Optik fließen lassen. Die Zeit und Arbeit bis zu meinen fertigen Karten möchte ich gerne hier teilen und vielleicht kannst Du damit ja was anfangen… Orientiert habe ich mich an folgendem Blogbeitrag, allerdings hab ich keinen Erfolg mit der Umsetzung gehabt. Daher habe ich mit der Integration für Tankerkönig folgende Karte erstellt:

Tankerkönig Card
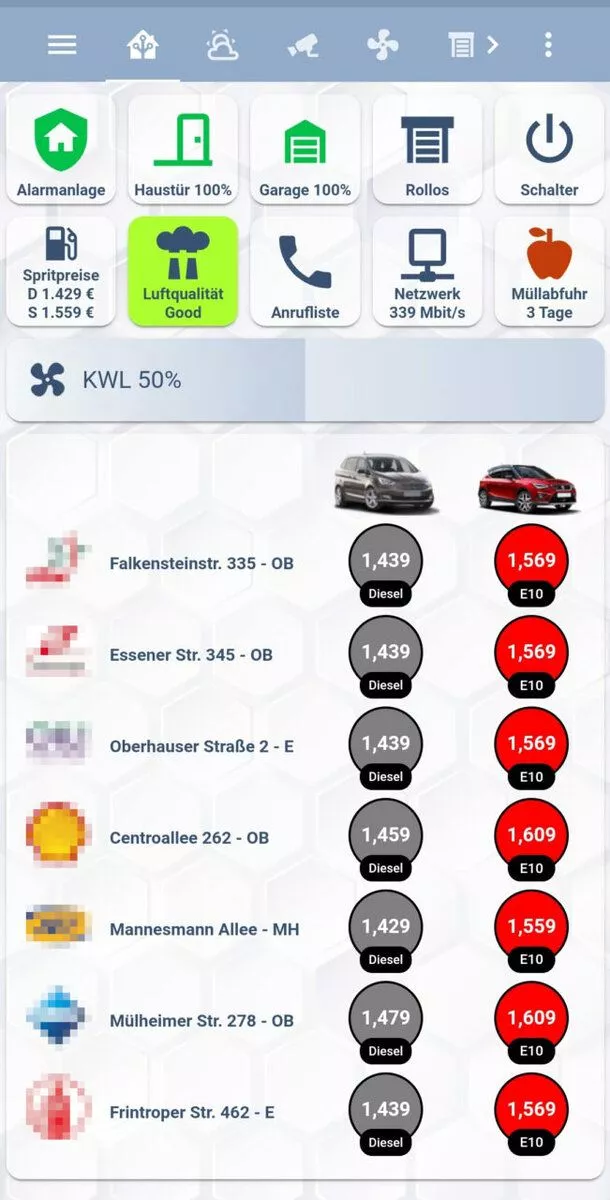
Alternativ schau doch auch mal bei Daniel vorbei, er hat auch noch eine Umsetzung nach Spritpreis sortiert in seinem Blog smarthomeyourself.de im Angebot
Spritpreise in Deiner Umgebung
API-Key bei tankerkönig.de
Um den API-Key zu bekommen, gehe auf folgende Seite und klicke zwei mal (ja richtig, zwei mal) auf den Menüpunkt API-Key:
https://creativecommons.tankerkoenig.de/
Trage Deine Daten dort ein und Du kriegst Deinen API-Key, der meines Wissens auf 10 Stations begrenzt sind pro Aufruf.
Finde Deine Tankstellen
Um einzelne Tankstellen-IDs (Station ID) auszulesen, pass folgenden Link auf Deine Bedürfnisse an (Quelle iobroker-Forum):
Dabei musst Du die lat und ing Angabe im Link anpassen auf Deine Koordinaten. Die findet man bei Google Maps heraus . Der Parameter rad steht für den Radius, hier also 10.
So oder so musst Du die configuration.yaml Deiner Home Assistant Installation anpassen. Dort sieht Du im folgenden Beispiel auch eine Möglichkeit automatisch Tankstellen im Umkreis einer Position hinzuzufügen. Da ich persönlich aber meine festen Tanken habe, habe ich einzelne Stations hinzugefügt:
tankerkoenig:
    api_key: !secret tankerkoenig_api_key
    #radius: 2.5
    show_on_map: false
    fuel_types:
        - "diesel"
        - "e10"
    #latitude: 51.4321
    #longitude: 6.7890
    stations:
    - 00000000-0aa0-0aa0-aaaa-a0000000aa00
    - ...
Template Sensor für die Feinheiten
Ich habe mir ein paar Template Sensoren erstellt für meine Tank-Favoriten. Das habe ich vor allem deshalb gemacht, damit in den Badges e10 und Diesel steht, aber Du kannst hier auch schon images hinterlegen und später mit Variablen arbeite usw. Schau Dir einfach das Bespiel aus meiner sensors.yaml an:
- platform: template
  sensors:
    template_tankstelle_xyz_diesel:
      value_template: '{{ states.sensor.tankerkoenig_tanke_xyz_diesel.state }}'
      unit_of_measurement: Diesel
      attribute_templates:
        image: "/local/gasstation_logos/tanke_1.png"
        opt_name: "Mustergasse 7b - Beispielstadt"

- platform: template
  sensors:
    template_tankstelle_xyz_e10:
      value_template: '{{ states.sensor.tankerkoenig_tanke_xyz_e10.state }}'
      unit_of_measurement: e10
      attribute_templates:
        image: "/local/gasstation_logos/tanke_1.png"
        opt_name: "Mustergasse 7b - Beispielstadt"
Hier musst Du natürlich nacharbeiten, damit der richtige Template-Wert angezeigt wird.
Anpassen der Karte
Jetzt geht es ans eingemacht. Da ich per HACS (HACS installieren) ein paar Frontend installiert habe, liste ich diese vorab:
Das Design ist stark auf meine Bedürfnisse zugeschnitten, aber ich denke, dass Du mit folgendem Code auch ein tolles Ergebnis erzielen kannst:
type: custom:stack-in-card
style:
  .: |
    ha-card {
      padding-left: 10px;
      padding-bottom: 10px;
      padding-top: 10px;
    }
cards:
  - type: vertical-stack
    cards:
      - type: horizontal-stack
        cards:
          - type: markdown
            content: ' '
            style:
              .: |
                ha-card {
                  background-color: transparent !important;
                  box-shadow: none !important;
                }
          - type: horizontal-stack
            cards:
              - type: picture
                image: /local/gasstation_logos/auto_1.png
                style:
                  .: |
                    ha-card {
                      background-color: transparent !important;
                      box-shadow: none !important;
                      margin-bottom: 5px;
                      margin-left: 0px;
                      margin-right: 0px;
                    }
                    ha-card img{
                      height: 43px;
                      width: 70px;
                      margin: auto;
                    }
              - type: picture
                image: /local/gasstation_logos/auto_2.png
                style:
                  .: |
                    ha-card {
                      padding: auto;
                      background-color: transparent !important;
                      box-shadow: none !important;
                      margin-bottom: 5px;
                      margin-left: 0px;
                      margin-right: 0px;
                    }
                    ha-card img{
                      height: 43px;
                      width: 70px;
                      margin: auto;
                    }
      - type: horizontal-stack
        cards:
          - type: markdown
            content: |
              <table>
                <tr>
                  <td width="50px;">
                    <img src = '/local/gasstation_logos/tankestelle_xyz.png' align='top' height='40'></img>
                  </td>
                  <td>
                    Beispielstraße 99 - Musterstadt
                  </td>
                </tr>
              </table>
            style:
              .: |
                ha-card {
                  max-height:51px;

                  padding-top: 0px;
                  background-color: transparent !important;
                  box-shadow: none !important;
                  }
                ha-markdown {
                  font-family: Arial;
                  font-size: 11px;
                  font-weight: bold;
                }
                .no-header {
                  padding: 0px !important;
                }
          - type: horizontal-stack
            cards:
              - type: custom:badge-card
                badges:
                  - entity: sensor.template_tankestelle_xyz_diesel
                    name: ' '
                    style: |
                      :host {
                        font-weight: bold;
                        --label-badge-text-color: white;
                        --label-badge-red: black;
                        --label-badge-background-color: gray;
                        --ha-label-badge-label-color: white;
                      }
              - type: custom:badge-card
                badges:
                  - entity: sensor.template_tankestelle_xyz_e10
                    name: ' '
                    style: |
                      :host {
                        font-weight: bold;
                        --label-badge-text-color: white;
                        --label-badge-red: black;
                        --label-badge-background-color: red;
                        --ha-label-badge-label-color: white;
                      }
      - type: horizontal-stack
        cards:
          - type: markdown
            content: |
              <table>
                <tr>
                  <td width="50px;">
                    <img src = '/local/gasstation_logos/tankestelle_abc.png' align='top' height='40'></img>
                  </td>
                  <td>
                    Essener Str. 345 - OB
                  </td>
                </tr>
              </table>
            style:
              .: |
                ha-card {
                  max-height:51px;

                  padding-top: 0px;
                  background-color: transparent !important;
                  box-shadow: none !important;
                  }
                ha-markdown {
                  font-family: Arial;
                  font-size: 11px;
                  font-weight: bold;
                }
                .no-header {
                  padding: 0px !important;
                }
          - type: horizontal-stack
            cards:
              - type: custom:badge-card
                badges:
                  - entity: sensor.template_tankestelle_abc_diesel
                    name: ' '
                    style: |
                      :host {
                        font-weight: bold;
                        --label-badge-text-color: white;
                        --label-badge-red: black;
                        --label-badge-background-color: gray;
                        --ha-label-badge-label-color: white;
                      }
              - type: custom:badge-card
                badges:
                  - entity: sensor.template_tankestelle_abc_e10
                    name: ' '
                    style: |
                      :host {
                        font-weight: bold;
                        --label-badge-text-color: white;
                        --label-badge-text-weight: bold;
                        --label-badge-red: black;
                        --label-badge-background-color: red;
                        --ha-label-badge-label-color: white;
                      }
Die Images kannst Du Dir z.B. per Google-Bilder Suche laden. Nutze dabei den Suchfilter Farbe: Transparent. Wenn Du die Skills hast, schneide das Bild zu und passe die Bildgröße an (z.B. 128X128px). Die Datein gehören dann in das config/www-Verzeichnis auf Deinem Home Assistant System. Im oben gezeigten Beispiel habe ich noch ein Verzeichnis gasstation_logos erstellt.